To Big for Blog but in Comps Folder :P
Wednesday, 6 May 2015
Refining My Animation Idea
-Item
I've changed my Item to 'Battery' to be my everyday item simply because it is easy to reproduce but also has similar features to my 'Scissors' which is all I need to create a similar character, also I originally didn't want to add characteristics to show off what I've learnt in Animation by showing character through only movement which is the reason why I picked 'Battery'.
-Story
I want to start it off with the the Battery standing to attention and spotting a 'shiny' new toy and after playing around a hand comes out of nowhere picks up the Battery and tries to push it into the toy controller but the Battery sparks and resists before wriggling its way out and escaping, then walks of screen in a grumpy tone.
-Scene
I want the scene to be on a semi-messy work desk, probably a students desk for ease, with lose paper and pens and pencils lying around and the toy controller slightly of center with a lamp in front for lighting, then having the Battery walk in from the left then noticing the toy. The Battery would be very simple 'being a real Battery, a AA Battery for structure and most commonly found around the house.
-Medium
I think using Stop Motion would be the most effective method, this way I can use real life aspects with the hand and controller, it also would make setting up the scene a lot easier and be able to film at home giving me more time to create the animation. Also I believe by using Stop Motion and making it real as possible it will add more shock value for when the Battery that suppose to be hard and rigid becomes energetic and lively.
-Morale
The meaning behind the animation would be simply 'We make are own Purpose/Destiny' like before.
Monday, 4 May 2015
Idea Change
After trying my Modelling Clay Scissors I found the Metal
wire skeleton made the model to hard and inflexible to create movement that
flowed well as if the Scissors were alive so I decided to remove the skeleton
but then the Model became way to heavy and loose to balance and manipulate so I
then tried to make the model smaller but I needed to have the Scissors be a
realistic size for the Hand and Scene.
In the end I decided to go back to my
Everyday Objects Idea list where I found the 'Battery' story which was very
similar to the Scissors story with the same scene and everything, this was
perfect I could use the same set-up and stick with my original plan of making
and object into a character through nothing more than there movements plus a
Battery's structure meant It could be manipulated with ease but still be
realistic size.
Sunday, 3 May 2015
Ladislas Starevich 'Stop Motion'
When it comes to stop motion Ladislas Starevich is the Pioneer who brought life to inanimate object, Ladislas had been creating stop motion since the 1910's until the 1930's, he revolutionized film with this new Stop Motion method and brought dreams and imagination to life with films such as The Beautiful Lukanida (1912), The Ant and the Grasshopper (1911), The frogs who wanted a king (1922), The eyes of the Dragon (1925)
Here is just a Snip Bit of 'The Mascot' 1933 which is just stunning quality for the time in which it was made.
Here is just a Snip Bit of 'The Mascot' 1933 which is just stunning quality for the time in which it was made.
Saturday, 2 May 2015
Adobe Premiere Pro the Basics
For my Stop-Motion Animation I used what was recommended to me 'Adobe Premiere Pro', this wasn't taught in the complementary studies without asking for help so I had to teach myself the basics and now I'm going to go through what I learnt.
First open up Premiere Pro and select 'New Project'

After this you can change the name of the project and it's directory. Next you will have a screen that looks like this.

To create Stop Motion we need a couple of things, first is the Images that we will be using for are stop motion, second is a 'Sequence' which is a Timeline which we can add are images to. Now there are a few ways we can do this, firstly we can import are images by either clicking the 'import media to start' in the bottom left hand corner or click File > Import > Media, then you'll have to find where you stored your images.

Now the first thing you can do is select all your images and import them, however doing this won't put your images in order so you'll have to order them by manually which if you have a lot of photos will take a long period of time, you'll also have to create a new sequence to drag your images into a Timeline to create a video.

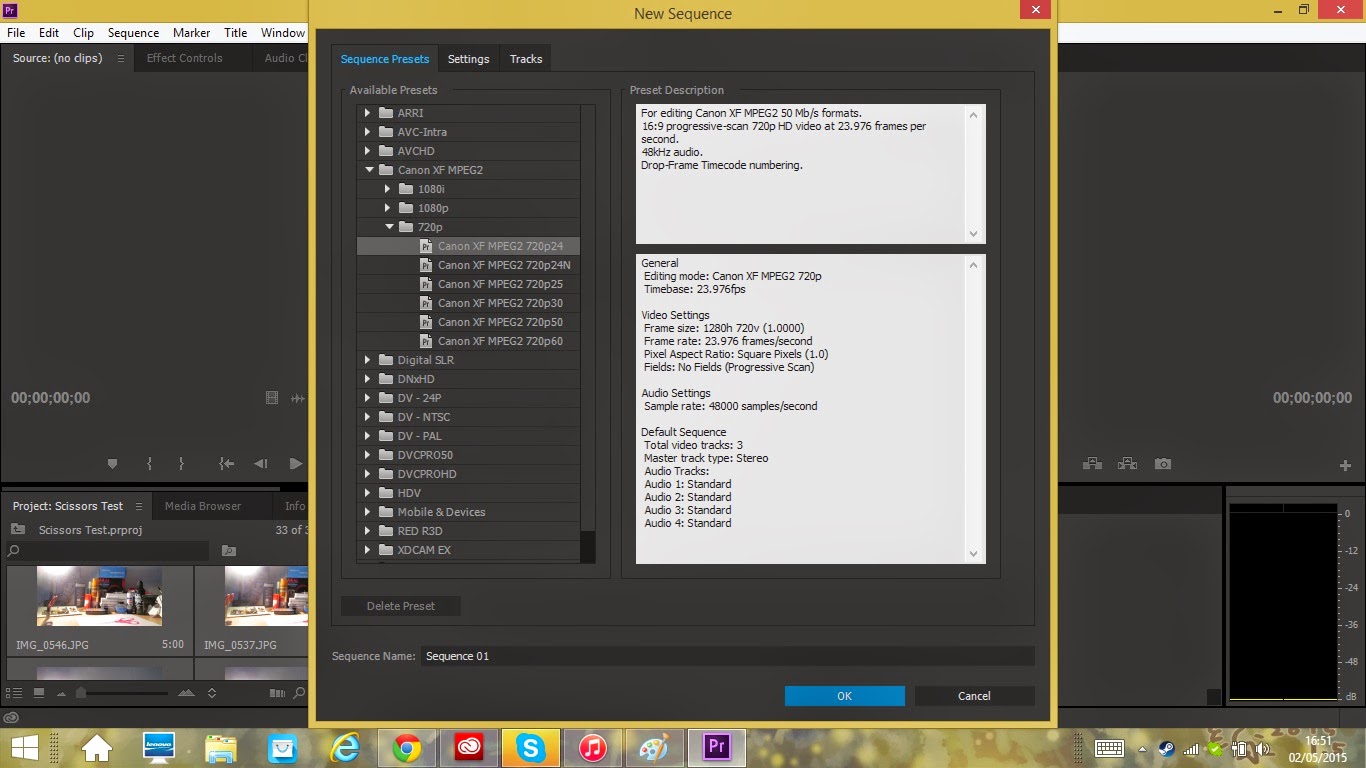
To create a new sequence for your Timeline simply click File > New > Sequence

After clicking this you'll be presented with a new screen which will allow you to select what format your images are and amount of fps you want for your timeline.

Now before dragging your images into the timeline you'll have to sort a out a few things, first select your images and right click them then click 'Speed/Duration'.

You'll be presented with this little window which will say 'Duration: 00:00:05:00' this means each image will show for 5 seconds, we want to change this depending on how many fps we have on our timeline (mines 26 fps) and on how many frames we want to show a second in our animation (I want around 12) so then we want to do a little maths and do 26/12 which gives me around 2 and this is what we change our duration to '00:00:00:02'.


Now we can finally drag our images to the timeline and have our Animation, we can then drag any audio files we want into the timeline and crop it to match our Animation to give it some sound.

We can then click File > Export > Media.

Then change the File type to what ever suits your needs (I use AVI) and you can change the name and directory by clicking the Output Name, and finally export your animation.

However like I said in the beginning there are a few easier ways, when importing your images you can select 'Import Sequence' which will import your images straight into a sequence in order straight from the get go.

However when I did this it only created a sequence using the first 13 images and I didn't know how to change the speed/duration like before. But not to worry I found away to import my images in order without making them into a sequence so I could change the speed/duration, simply import the whole folder your images are held in.

By doing this your images will be imported in order and you'll save your self a load of time, now simply follow the steps same as before to create your animation.

First open up Premiere Pro and select 'New Project'
After this you can change the name of the project and it's directory. Next you will have a screen that looks like this.
To create Stop Motion we need a couple of things, first is the Images that we will be using for are stop motion, second is a 'Sequence' which is a Timeline which we can add are images to. Now there are a few ways we can do this, firstly we can import are images by either clicking the 'import media to start' in the bottom left hand corner or click File > Import > Media, then you'll have to find where you stored your images.
Now the first thing you can do is select all your images and import them, however doing this won't put your images in order so you'll have to order them by manually which if you have a lot of photos will take a long period of time, you'll also have to create a new sequence to drag your images into a Timeline to create a video.
To create a new sequence for your Timeline simply click File > New > Sequence
After clicking this you'll be presented with a new screen which will allow you to select what format your images are and amount of fps you want for your timeline.
Now before dragging your images into the timeline you'll have to sort a out a few things, first select your images and right click them then click 'Speed/Duration'.
You'll be presented with this little window which will say 'Duration: 00:00:05:00' this means each image will show for 5 seconds, we want to change this depending on how many fps we have on our timeline (mines 26 fps) and on how many frames we want to show a second in our animation (I want around 12) so then we want to do a little maths and do 26/12 which gives me around 2 and this is what we change our duration to '00:00:00:02'.
We can then click File > Export > Media.
Then change the File type to what ever suits your needs (I use AVI) and you can change the name and directory by clicking the Output Name, and finally export your animation.
However like I said in the beginning there are a few easier ways, when importing your images you can select 'Import Sequence' which will import your images straight into a sequence in order straight from the get go.
However when I did this it only created a sequence using the first 13 images and I didn't know how to change the speed/duration like before. But not to worry I found away to import my images in order without making them into a sequence so I could change the speed/duration, simply import the whole folder your images are held in.
By doing this your images will be imported in order and you'll save your self a load of time, now simply follow the steps same as before to create your animation.
Wednesday, 29 April 2015
Wednesday, 22 April 2015
Modeling Process Scissors
Step 1
Wiring the skeleton of 'Scissors' the only Model and main charater of this Stop-Motion animation.

Step 2
Covering the Skeleton in the apropreate coloured modelling clay.


Step 3
Smothing the clay to shape that is primarly used in the animation

Step 4
Testing model poses that will be used in the animation to test if It can bend the way it's needed.


Wiring the skeleton of 'Scissors' the only Model and main charater of this Stop-Motion animation.
Step 2
Covering the Skeleton in the apropreate coloured modelling clay.
Step 3
Smothing the clay to shape that is primarly used in the animation
Step 4
Testing model poses that will be used in the animation to test if It can bend the way it's needed.
Thursday, 16 April 2015

Wednesday, 15 April 2015
Story Boarding My Idea
So I've began to Story Board, 'The Scissors' (title a working progress) It starts of with the Scissors walking into Scene 1 and noticing an Image of another pair of scissors lying on the work desk, Scissors then becomes friendly an attached the Image but then 'The Hand' comes into play and tries to grab Scissors however Scissors narrowly jumps out the way.
Story Board Page 1

Hand then goes in again but Scissors jumps out of the way once more, however Hand quickly swoops in for a third time and this time successfully grabs Scissors. Transition into Scene 2 where Hand is now trying to cut the Image using Scissors but as Hand tries to cut down on the Image but Scissors resists and becomes all stiff and rigid and even tries to use two hand to clamp it down but is no use
Story Board Page 2

Hand then Gives Scissors a good shake and tries to cut the Image once again but this time when he tries to use Scissors, Scissors becomes all floppy and just unusable so finally Hand gives up and throws Scissors and The Image of the other scissors back onto the desk and Transition back to Scene 1 where Scissors lies on the desk all droopy waiting for Hand to disappear, when Hand finally disappears Scissors gets back up and grabs the image and drags it off Scene 1. End of Animation.
Story Board Page 3

Story Board Page 1
Hand then goes in again but Scissors jumps out of the way once more, however Hand quickly swoops in for a third time and this time successfully grabs Scissors. Transition into Scene 2 where Hand is now trying to cut the Image using Scissors but as Hand tries to cut down on the Image but Scissors resists and becomes all stiff and rigid and even tries to use two hand to clamp it down but is no use
Story Board Page 2
Hand then Gives Scissors a good shake and tries to cut the Image once again but this time when he tries to use Scissors, Scissors becomes all floppy and just unusable so finally Hand gives up and throws Scissors and The Image of the other scissors back onto the desk and Transition back to Scene 1 where Scissors lies on the desk all droopy waiting for Hand to disappear, when Hand finally disappears Scissors gets back up and grabs the image and drags it off Scene 1. End of Animation.
Story Board Page 3
Wednesday, 25 March 2015
Refining My Animation Idea
Refining Idea
-Item
I've decided on 'Scissors' to be my everyday item simply it is easy to reproduce but also has similar features to a human with razor stilts for legs and finger holes for eyes which is all I need to create character, I also don't want to add characteristics to show off what I've learn't in Animation by showing character through only movement which is the reason why I picked Scissors.
-Story
I want to start it off with the scissors spotting an image of another 'shiny' and new pair of scissors and falling head over heels for the picture but after playing around a person picks up the scissors and tries to cut up the image but the scissors bend and resist cutting the image and finds away to wriggle out and escape.
-Scene
I want the scene to be on a semi-messy work desk, probably a students desk for ease, with lose paper and pens and pencils lying around and the image of the scissors slightly of center with a window in front for natural light, then having the modelled scissors walk in from the left then noticing the image. The modelled scissors would be very simple 'two coloured' like the scissors you would give to a child to use and would be made with plasticine.
-Medium
I think using Stop Motion would be the most effective method that way I can use real life aspects with the hand and image, it also would make setting up the scene a lot easier and be able to film at home giving me more time to create the animation. Also I believe by using Stop Motion and making it real as possible it will add more shock value for when the scissors that suppose to be hard and rigid, resist and become loose and floppy.
-Morale
The meaning behind the animation would be simply 'We make are own Purpose/Destiny'.
Wednesday, 18 March 2015
Animation Ideas
My first Idea for creating an animation would be to use the concept of 'Sentient', something gaining life perhaps an everyday object like a battery or a bottle and then having the object go on a little adventure, perhaps telling a story of what that object is usually used for and go against it, almost implying this idea of a life having a destiny and then going against it to fulfil its own wishes.
Objects and there uses.
- Battery - Being stuffed and stored in a toy or controller
- Bottle - Forcefully having its fluids drained
- Scissors - Being forced to cut something it likes
- Tissue Roll - Slowly being used
- Balloon - Forcefully blown up and popped
- Cutlery - Picked up and taken away one by one to be washed
- Tooth Brush - Forced to brush teeth
- Food/Sandwich - Given character then eaten
The meaning would either be Happy with the object going against its destiny and claiming it's freedom or be Sad and will be forced to do its purpose and then thrown away after given character and being adorable to create sympathy within the viewer.
I would most likely use stop motion for this animation, I like the idea of something becoming sentient or 'Human' over time. I would like to use what I've learnt during this complementary studies to give character through is movements rather than the characteristics or appearance.
- Story Board -
Thursday, 12 March 2015
BLU 'Muto'
A weird graffiti art animation which is more like Stop Motion made by MUTO who produces these mind boggling animation on streets around the world.
Once again being an Fine Artist when it comes to animation my mind goes straight to 'BLUBLU' or 'MUTO' who created these really out there films using graffiti and washable paint that depict a man going through multiple nightmarish transformation that feel like a Tim Burton acid trip.
Wednesday, 11 March 2015
'Pin Puppet' & 'Rotation' in Adobe 'After Effects'
For are fourth session into this Complementary Studies 'Animation' course we learnt the basics of 'After Effects' or more precisely the Pin Tool used to change an image into an animation.

Using the Pin Tool I can add Rotation Points into my images almost like 'Joints' in a human body in which to make the image move as if it were a living creature. We did have to draw up the image in photoshop and separate the limbs, head and torso into there own layers so when moving the image it only moves that section rather than the whole image.


Then selecting the 'Time Bar' so the image moves in the time period I want it to.

Then it's just a case of exporting the animation into a GIF file giving me this.

I then was taught how to use Rotation in 'After Effects' so you can move the image without having to stretch or manipulate the Image. It is very similar to the 'Pin Puppet' using the pins for joints on the character in the Layered parts of the Image.

Using the Drop Down arrow on the pins will show you the grid details of the pin on the Image then clicking the 'Time Bar' again and clicking the stopwatch icon to record what is happening on that pin you can change the angle of rotation to rotate the layers on your image.

I went through my image again adding colour and using rotation technique we just learnt this time to create this exported GIF.

Wednesday, 4 March 2015
Walk Cycle in Flash
This Session we learnt how to create a Character Walk Cycle. We were told that the walk cycle is something you would have to do if you were to go into animation and it is one of more difficult things to do in animation and having the Character move smoothly is essential for a good animation.
Using what we had learnt in flash I would create a walk cycle using this template as reference.
I started with using my typical Heartless Character that I use when experimenting outlining the form and using the reference as guidance to a smooth walk.

Then after getting my walk cycle down I went over it adding colour and shading to finish up my character and having a looping Heartless walk cycle.

Subscribe to:
Comments (Atom)