To Big for Blog but in Comps Folder :P
Wednesday, 6 May 2015
Refining My Animation Idea
-Item
I've changed my Item to 'Battery' to be my everyday item simply because it is easy to reproduce but also has similar features to my 'Scissors' which is all I need to create a similar character, also I originally didn't want to add characteristics to show off what I've learnt in Animation by showing character through only movement which is the reason why I picked 'Battery'.
-Story
I want to start it off with the the Battery standing to attention and spotting a 'shiny' new toy and after playing around a hand comes out of nowhere picks up the Battery and tries to push it into the toy controller but the Battery sparks and resists before wriggling its way out and escaping, then walks of screen in a grumpy tone.
-Scene
I want the scene to be on a semi-messy work desk, probably a students desk for ease, with lose paper and pens and pencils lying around and the toy controller slightly of center with a lamp in front for lighting, then having the Battery walk in from the left then noticing the toy. The Battery would be very simple 'being a real Battery, a AA Battery for structure and most commonly found around the house.
-Medium
I think using Stop Motion would be the most effective method, this way I can use real life aspects with the hand and controller, it also would make setting up the scene a lot easier and be able to film at home giving me more time to create the animation. Also I believe by using Stop Motion and making it real as possible it will add more shock value for when the Battery that suppose to be hard and rigid becomes energetic and lively.
-Morale
The meaning behind the animation would be simply 'We make are own Purpose/Destiny' like before.
Monday, 4 May 2015
Idea Change
After trying my Modelling Clay Scissors I found the Metal
wire skeleton made the model to hard and inflexible to create movement that
flowed well as if the Scissors were alive so I decided to remove the skeleton
but then the Model became way to heavy and loose to balance and manipulate so I
then tried to make the model smaller but I needed to have the Scissors be a
realistic size for the Hand and Scene.
In the end I decided to go back to my
Everyday Objects Idea list where I found the 'Battery' story which was very
similar to the Scissors story with the same scene and everything, this was
perfect I could use the same set-up and stick with my original plan of making
and object into a character through nothing more than there movements plus a
Battery's structure meant It could be manipulated with ease but still be
realistic size.
Sunday, 3 May 2015
Ladislas Starevich 'Stop Motion'
When it comes to stop motion Ladislas Starevich is the Pioneer who brought life to inanimate object, Ladislas had been creating stop motion since the 1910's until the 1930's, he revolutionized film with this new Stop Motion method and brought dreams and imagination to life with films such as The Beautiful Lukanida (1912), The Ant and the Grasshopper (1911), The frogs who wanted a king (1922), The eyes of the Dragon (1925)
Here is just a Snip Bit of 'The Mascot' 1933 which is just stunning quality for the time in which it was made.
Here is just a Snip Bit of 'The Mascot' 1933 which is just stunning quality for the time in which it was made.
Saturday, 2 May 2015
Adobe Premiere Pro the Basics
For my Stop-Motion Animation I used what was recommended to me 'Adobe Premiere Pro', this wasn't taught in the complementary studies without asking for help so I had to teach myself the basics and now I'm going to go through what I learnt.
First open up Premiere Pro and select 'New Project'

After this you can change the name of the project and it's directory. Next you will have a screen that looks like this.

To create Stop Motion we need a couple of things, first is the Images that we will be using for are stop motion, second is a 'Sequence' which is a Timeline which we can add are images to. Now there are a few ways we can do this, firstly we can import are images by either clicking the 'import media to start' in the bottom left hand corner or click File > Import > Media, then you'll have to find where you stored your images.

Now the first thing you can do is select all your images and import them, however doing this won't put your images in order so you'll have to order them by manually which if you have a lot of photos will take a long period of time, you'll also have to create a new sequence to drag your images into a Timeline to create a video.

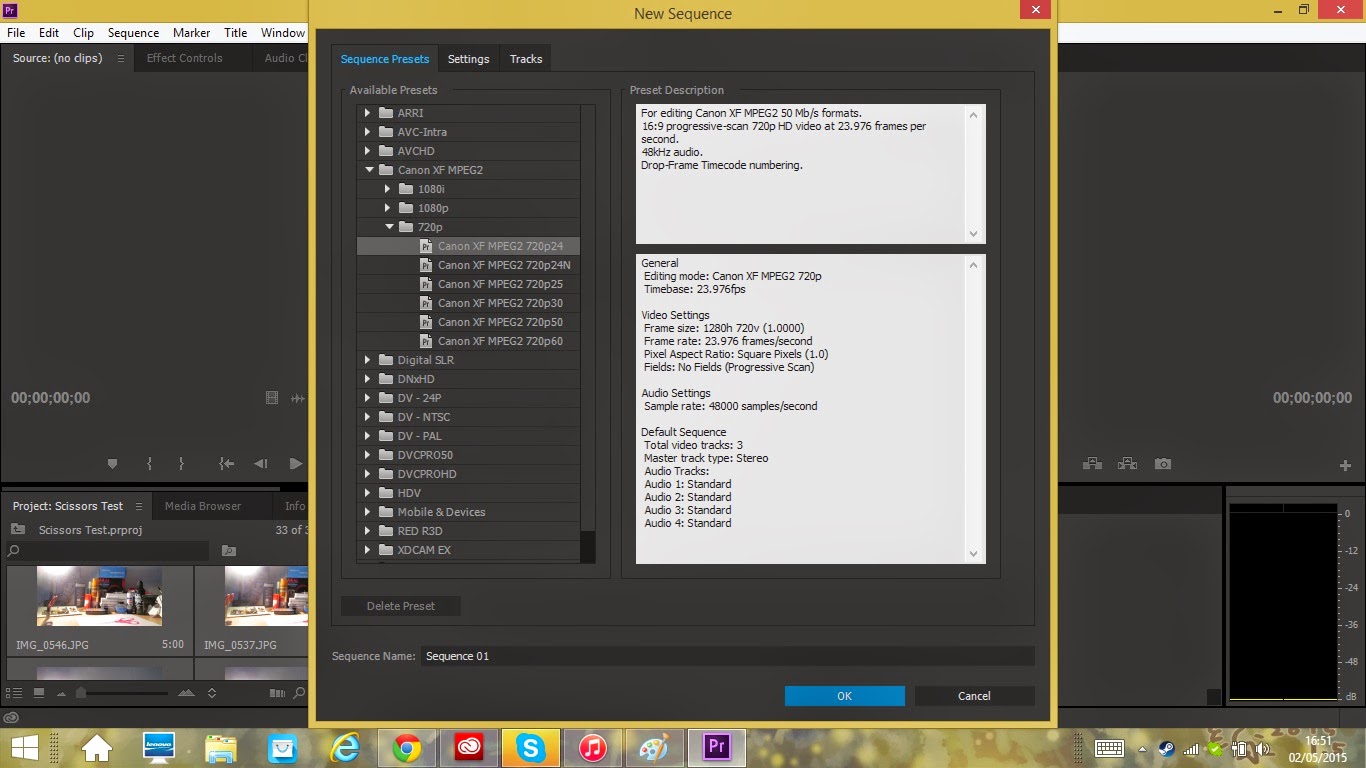
To create a new sequence for your Timeline simply click File > New > Sequence

After clicking this you'll be presented with a new screen which will allow you to select what format your images are and amount of fps you want for your timeline.

Now before dragging your images into the timeline you'll have to sort a out a few things, first select your images and right click them then click 'Speed/Duration'.

You'll be presented with this little window which will say 'Duration: 00:00:05:00' this means each image will show for 5 seconds, we want to change this depending on how many fps we have on our timeline (mines 26 fps) and on how many frames we want to show a second in our animation (I want around 12) so then we want to do a little maths and do 26/12 which gives me around 2 and this is what we change our duration to '00:00:00:02'.


Now we can finally drag our images to the timeline and have our Animation, we can then drag any audio files we want into the timeline and crop it to match our Animation to give it some sound.

We can then click File > Export > Media.

Then change the File type to what ever suits your needs (I use AVI) and you can change the name and directory by clicking the Output Name, and finally export your animation.

However like I said in the beginning there are a few easier ways, when importing your images you can select 'Import Sequence' which will import your images straight into a sequence in order straight from the get go.

However when I did this it only created a sequence using the first 13 images and I didn't know how to change the speed/duration like before. But not to worry I found away to import my images in order without making them into a sequence so I could change the speed/duration, simply import the whole folder your images are held in.

By doing this your images will be imported in order and you'll save your self a load of time, now simply follow the steps same as before to create your animation.

First open up Premiere Pro and select 'New Project'
After this you can change the name of the project and it's directory. Next you will have a screen that looks like this.
To create Stop Motion we need a couple of things, first is the Images that we will be using for are stop motion, second is a 'Sequence' which is a Timeline which we can add are images to. Now there are a few ways we can do this, firstly we can import are images by either clicking the 'import media to start' in the bottom left hand corner or click File > Import > Media, then you'll have to find where you stored your images.
Now the first thing you can do is select all your images and import them, however doing this won't put your images in order so you'll have to order them by manually which if you have a lot of photos will take a long period of time, you'll also have to create a new sequence to drag your images into a Timeline to create a video.
To create a new sequence for your Timeline simply click File > New > Sequence
After clicking this you'll be presented with a new screen which will allow you to select what format your images are and amount of fps you want for your timeline.
Now before dragging your images into the timeline you'll have to sort a out a few things, first select your images and right click them then click 'Speed/Duration'.
You'll be presented with this little window which will say 'Duration: 00:00:05:00' this means each image will show for 5 seconds, we want to change this depending on how many fps we have on our timeline (mines 26 fps) and on how many frames we want to show a second in our animation (I want around 12) so then we want to do a little maths and do 26/12 which gives me around 2 and this is what we change our duration to '00:00:00:02'.
We can then click File > Export > Media.
Then change the File type to what ever suits your needs (I use AVI) and you can change the name and directory by clicking the Output Name, and finally export your animation.
However like I said in the beginning there are a few easier ways, when importing your images you can select 'Import Sequence' which will import your images straight into a sequence in order straight from the get go.
However when I did this it only created a sequence using the first 13 images and I didn't know how to change the speed/duration like before. But not to worry I found away to import my images in order without making them into a sequence so I could change the speed/duration, simply import the whole folder your images are held in.
By doing this your images will be imported in order and you'll save your self a load of time, now simply follow the steps same as before to create your animation.
Subscribe to:
Comments (Atom)